
The Magic of Preserves
For many preserving is classed as one of the dark arts of the kitchen. A mystifying process reserved for those with a supernatural ability to calculate a fruit’s pectin potential by just looking at it. These are people who have the innate ability to mix measured quantities of fruit and sugar in large pots and make the mix miraculously gel. They know the rules, they cast the spells. They collect the resulting concoction in recycled jars with homemade labels to adorn their pantry shelves while they await the inevitable apocalypse, or gift-giving season, whichever comes first.
The truth is, preserving will cast a spell on you. But only once you realize just how easy it is to do. The only magic going on is the simple pleasure of spreading a taste of summer on a piece of toast on a cold, wintery morning. And if you aren’t the kind of family that gets through jar after jar of jam, the feeling of goodwill as you hand a friend a jar is heartwarming. Homemade always means something more.
Always the pedant, here’s a low-down of the different preserving definitions, just so we are all on the same page. All use the same process which is to heat fruit and sugar which releases pectin, the natural setting agent in fruit.
Preserves / Conserves are made with whole fruit or large fruit pieces. Confusingly, often used to describe all forms of preserving fruit with sugar (jams, jellies & marmalades).
Jams are made with cut, crushed or pureed fruit.
Jellies are made with fruit juice
Marmalades are made with the pulp and rind of citrus fruits.
There are few ground rules to making preserves, but after your first go you’ll most likely be checking out the jam stalls at markets and on supermarket shelves to try your own version at home. It’s kind of addictive.
Equipment:
A pot. You want this to be a large, heavy-bottomed pot – consider it your cauldron. The more surface area for evaporation the better. There also needs to be enough room for the mixture to bubble up, so if your pot is filled to the brim to start, you’ll need a bigger pot. I use a 6L copper pot. Copper conducts heat best, but anything other than aluminium will work great.
Glass jars with lids. At least a half a dozen. I use 230ml screw top jars from here or if I am feeling really fancy, some Ball jars from here. But you can reuse jars from your own cupboard (pasta sauce jars are perfect) or head to the supermarket as they usually stock those handsome swing-top jars.
A knife and board for cutting the fruit.
A slotted spoon or strainer in case you need to boil fruit to remove the skin as in the case of apricots, peaches and plums.
A wooden spoon for stirring.
A ladle for pouring jam into jars.
A jam funnel which is not entirely essential, but if your aim is a little off and you’d rather not think of the consequences of molten sugar on skin, then you’ll love one of these. They are available from cookware shops.
Labels this could be a simple as a Sharpie pen or as elaborate as a specially printed label or tag.
You can also get special jam jar tongs for lifting hot jars after sterilising, but I find regular tongs and a tea towel work just as well.
Fruit take your pick of whatever is in season and take advantage of making your own combination – ones that can’t be found in the shops.
Sugar The regular white kind. Generally you’ll use half as much sugar as fruit. So if you have 1kg of strawberries, you’ll be using 500g sugar.
Acid This usually comes from the fruit you’re using such as citrus, but if you decide to make a jam from low-acid fruit, such as cherries, berries, peaches, pears or plums you’ll need the help of some lemon juice and/or its seeds to aid in gelling. If the recipe calls for the seeds, they will need to be wrapped in a piece of muslin, added to the pot and removed just before jarring.
Pectin You can buy pectin to help with gelling, or ‘setting’, but I’ve never had the need to use it. If you do, you’ll need to almost double the sugar. Also, you’ll be boiling the fruit for a lot less time because the pectin works so quickly to gel the fruit. This results in a less concentrated fruit flavoured jelly.
Sterilising. This is probably where the dark art element of preserving comes in to play. It seems tricky but really, it’s not. Yes, it has to be done. No, you won’t get it wrong and poison anyone. It’s not hard. There are two ways this can be done – take your pick. When you think your jam is about to reach its ‘setting point’ (starts gelling) simply:
1. Boil a large pot of water on the stove. Fully submerge the jars and lids in the water for at least 3 minutes. You may have to do this in batches depending on how big your pot is and how many jars you have. Pull them out of the water with tongs and a tea towel and place them upright on paper towel or a clean tea towel to air-dry for a few minutes before filling them with the jam.
2. Heat oven to 120°C. Wash the jars in warm soapy water and rinse clean. Place upright on a tray and warm in oven for 10 minutes. Pull out of the oven and fill them with the jam.
Don’t fill cold jars with hot jam as they may crack. You want your jars and jam to be as hot as possible when it comes to filling. Fill jars almost to the top (leave about 0.5cm) and secure lids. Turn upside down for 5 minutes and flip them back to upright. This will help seal the jars. Store in a cool dark cupboard or refrigerator for up to 3 months. Once they are opened keep refrigerated.
If you want to keep your jams for up to a year you can seal the jars completely by putting them in a boiling water bath after jarring.
1. Fill a large pot with water and bring it to the boil. The water level should be 5cm above the top of the jars.
2. Place a clean folded tea towel in the bottom of the pot. Hold it down with a pair of tongs while you are filling the pot with the jars. Space the jars so they are not touching each other.
3. Return the water to a boil, and then lower the heat so that the water bubbles consistently. After 10 minutes, remove the jars from the water with a pair of tongs (this is were the special jam tongs I mentioned earlier are great) and set them on a tea towel to cool. You will know that your jars are sealed when you hear the pop of the center of the lids while they are boiling.
Now you are ready to jam.
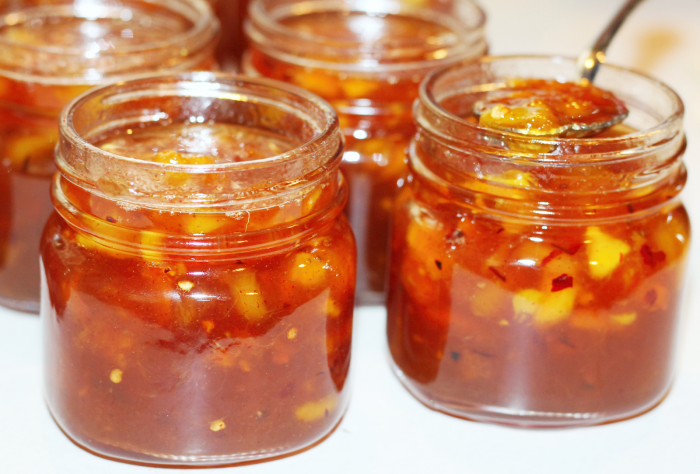
The recipe I have is for a peach and orange preserve. A jamalade if you will – sweet chunks of peach broken up by zingy little strips of orange peel. Your kitchen will be filled with the heady fragrance of sugary peaches all day.
Peach and Orange Preserve
Makes approx 6 x 230ml jars
1 orange (Seville variety if you can)
2kg yellow peaches
4 cups sugar
Juice of 1/2 large lemon
1. Bring a large pot of water to a boil.
2. Meanwhile, scrub the orange to remove any wax. Slice off each end, quarter lengthwise and slice as thinly as possible.
3. Fill a large bowl with iced water and set it next to the stove. Halve the peaches by cutting along the crease through to the pit and all the way around. Twist the halves in opposite directions to release them from the pit, and then remove the pit. Depending how ripe the peaches are this can be rather difficult (unripe, use a knife as a lever) or really easy (very ripe, just use your fingers). Drop the peaches into the boiling water several at a time to blanch them and loosen the skins. Again, depending how ripe the peaches are this could take a few minutes (unripe) to a few seconds (very ripe). Transfer them with a slotted spoon to the bowl of cold water for another half a minute to cool them. Peel off the skin, lay them flat side down on a cutting board and cut them in 2cm thick slices.
4. Combine the orange and peach slices, sugar, and lemon juice into a pot. Slowly bring the mixture to a boil over a medium-high heat, stirring to dissolve the sugar and continue to cook, stirring occasionally. The peaches and orange rind will begin to look translucent. This can take anywhere from 20 to 40 minutes, depending on how ripe the peaches are. More frequent stirring toward the end of cooking is required as the syrup thickens and the fruit sinks to the bottom where they can stick and burn to the pot.
5. As the syrup begins to thicken and you suspect it may be ready test the mixture to see if it’s reached ‘setting point’. Place a couple of small saucers in the freezer for 2 minutes. Pull them out and place a small spoonful of the syrup onto the plate. Wait a minute for the mixture to cool and then run your finger through the middle to form a channel. If the channel does not close up immediately, your jam is ready.
6. Ladle the hot jam into clean, warm jars, leaving 0.5cm gap and place the lid on top. Turn upside down for 5 minutes to help seal the jar. Store upright in a cool dark cupboard or refrigerator for up to 3 months. Once they are opened keep refrigerated. If you’d like to keep your jam for longer, see the note above under sterilising for instructions on a boiling water bath.
Here’s a few ways you can enjoy your preserves:
+ Spread on fresh bread, toast, English muffins, pancakes, waffles, muffins, scones and croissants
+ Mix into plain yoghurt
+ Mix with ice cream
+ Top pork chops with apricot or plum jam
+ Add to trifle
+ Spread on to the pastry base of fruit tarts